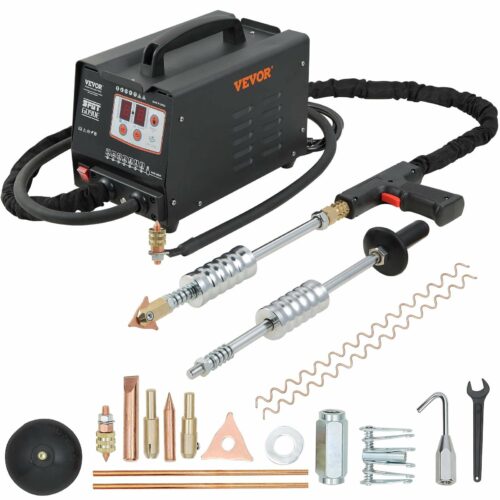
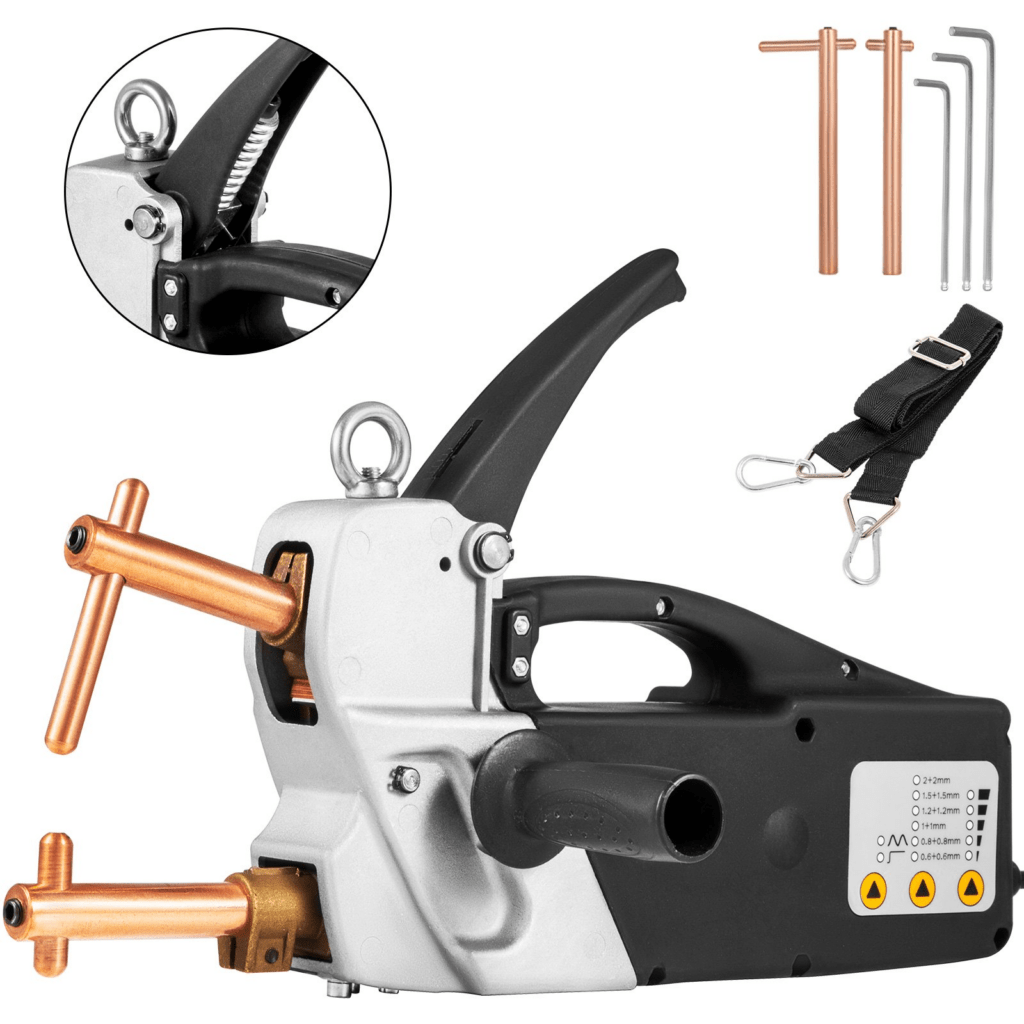
The stud welder — also called dent puller, stud gun or dent pulling gun — is the reference tool for dent repair without panel removal in auto body work. Its principle: a stud or pin is welded in milliseconds by capacitor discharge onto the outer face of the damaged panel, then a controlled pulling force draws the metal back into shape — without any access to the back of the panel. It is the essential companion to the spot welder in every body shop.
SOUDURE TIG · MIG/MAG
MMA · PAR POINT · DÉBOSSELAGE
Liens fiables et vérifiés — disponibles sur Amazon & AliExpress

This complete guide to the auto body stud welder covers everything you need to use it effectively: the capacitor discharge welding principle, settings by sheet thickness, the dent pulling technique step by step, common faults and corrections, and how to choose the right equipment. Also check our guides on MIG/MAG welding, TIG welding and spot welding for a full overview of body repair processes.
1. Stud welder principle: capacitor discharge welding
The stud welder works by capacitor discharge welding (CDW): a charged capacitor releases in a few milliseconds an intense electrical pulse through a stud or pin positioned on the panel. This discharge generates localised heat that welds the stud base onto the outer face of the sheet metal without penetrating it — no hole, no drilling, no access to the reverse side needed. Once the stud is welded, a pulling tool (slide hammer, lever puller, bridge puller) is attached to the stud and pulls the panel outward to restore its original shape.
The process runs in four steps: preparation and stripping of the damaged area (paint removed to bare metal), welding the stud or pin onto the dent, controlled pulling to restore the panel shape, then stud removal and sanding to finish the surface. A simple dent can be repaired in a few minutes without removing the panel.
Stud welder vs spot welder: two complementary tools
| Criterion | Stud welder (dent puller) | Spot welder (resistance) |
|---|---|---|
| Principle | Capacitor discharge on 1 face | Resistance heating between 2 electrodes |
| Access required | ✅ Outer face only | Both sides of the panel |
| Primary use | Dent pulling, panel straightening | Panel joining / spot reconstruction |
| Joint produced | Temporary stud (removed after) | Permanent weld nugget |
| Typical application | Dent on door, fender, hood | Panel replacement, structural spot repair |
| Panel removal needed | ✅ No (repair in place) | Sometimes (two-side access) |
2. Stud welder settings by sheet thickness
Stud welder settings depend mainly on sheet thickness, metal type (mild steel, galvanised steel, aluminium) and stud diameter. The values below are guidelines for bare mild steel with standard studs Ø 2–3 mm (approx. 0.08–0.12 in). The panel must be stripped to bare metal in the weld area to ensure good electrical conductivity.
Stud welder settings chart — mild steel (indicative values)
| Sheet thickness | Recommended power | Discharge time | Stud type | Recommended pull |
|---|---|---|---|---|
| 0.024–0.031 in (0.6–0.8 mm) | Low (30–50 %) | Very short | Thin stud Ø 2 mm | Light slide hammer |
| 0.031–0.039 in (0.8–1.0 mm) | Low–Med (40–60 %) | Short | Standard stud Ø 2.5 mm | Standard slide hammer |
| 0.039–0.047 in (1.0–1.2 mm) | Medium (50–70 %) | Short | Standard stud Ø 3 mm | Standard slide hammer |
| 0.047–0.059 in (1.2–1.5 mm) | Med–High (60–80 %) | Short–Med | Heavy stud Ø 3 mm | Heavy slide hammer |
| 0.059–0.079 in (1.5–2.0 mm) | High (70–90 %) | Medium | Bolt / washer | Bridge puller |
| Aluminium 0.8–1.5 mm | Low–Med (40–65 %) | Very short | Dedicated alu stud | Very gradual pull |
Key rule: always start at low power and increase gradually until the stud holds firmly without burning the panel. Stud pulls off at low force → power too low. Burn mark around the stud → power too high or discharge too long. Always test on a scrap piece of the same material before working on the vehicle.
3. Dent pulling technique with a stud welder: step by step
Step 1 — Assessment: Analyse the dent under raking light (lowest point, tension zones, creases). Mark weld points — always work from the outer edge toward the centre, never the reverse. Step 2 — Surface prep: Grind the weld zone to bare metal. Paint, primer and underbody wax all block current flow. Step 3 — Weld studs: Set power according to thickness (see chart above). Hold gun perpendicular, press firmly and trigger. Weld studs in a staggered pattern from the edge to the centre, 15–25 mm apart. Step 4 — Pull and straighten: Attach slide hammer or lever to the first stud (edge). Apply slow, controlled, progressive force — never a violent jerk. Check under raking light regularly. Step 5 — Remove studs: Snip studs flush with side cutters or twist to break. Grind remaining base with angle grinder or orbital sander. Step 6 — Finish: Sand weld marks, skim with polyester filler if needed, prime and repaint.
4. Common stud welder faults and corrections
| Fault observed | Likely cause | Correction |
|---|---|---|
| Stud pulls off at low force | Power too low, paint on surface, oxidised electrode | Increase power, grind to bare metal, clean electrode |
| Burn mark around stud | Power too high or discharge too long, panel too thin for setting | Reduce power, use smaller diameter stud |
| Stud welded at an angle | Gun not perpendicular, insufficient pressure at trigger | Hold gun perpendicular and press firmly before triggering |
| Over-pull (panel stretched) | Too violent or too localised a pull, working centre-out | Work edge-to-centre, gradual and controlled pull |
| No weld (no discharge) | Painted surface (no contact), faulty earth clamp | Grind to bare metal, check earth clamp and cable |
| Panel burned through | Power far too high for thickness, corroded panel | Strongly reduce power, check panel condition, test on scrap |
5. Stud welder applications in body repair
The stud welder is the tool of choice whenever access to the back of the panel is impossible or too time-consuming. In auto body repair, its main applications are dent pulling on doors (removing inner trim is slow and risky), fenders (often spot-welded to the body without direct inner access), hoods / bonnets (double-skin construction hard to reach), roofs (very limited inner access, risk of headliner damage), floors and sills after impact, and door edges and flanges bent in a scrape. Beyond automotive, stud welders are used in commercial vehicle bodywork (trailers, tipper bodies), agricultural machinery repair (tractor bodywork), light aircraft maintenance (aluminium skins) and marine aluminium hull repair. The ability to work from one side makes it universally useful for any sheet metal straightening job. Per AWS D8.7M and I-CAR guidelines, OEM repair procedures should always be consulted for structural panels before any repair.
6. Choosing the right stud welder
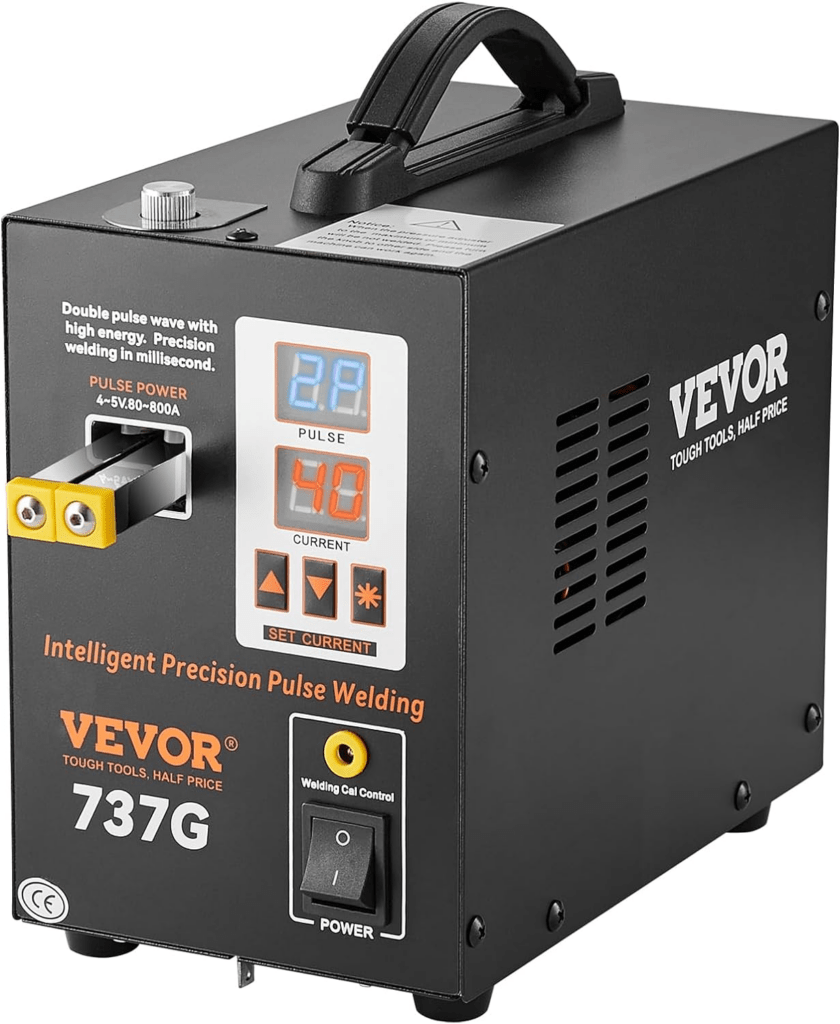
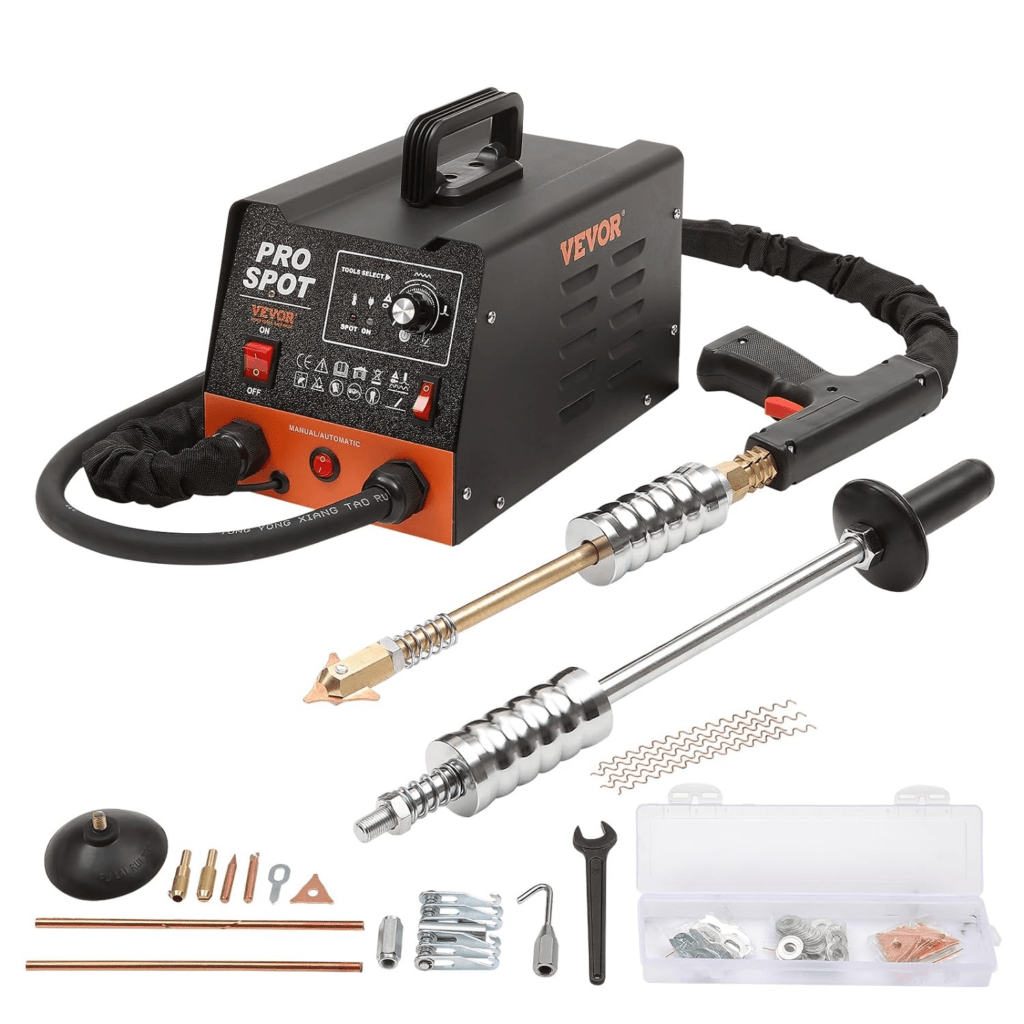
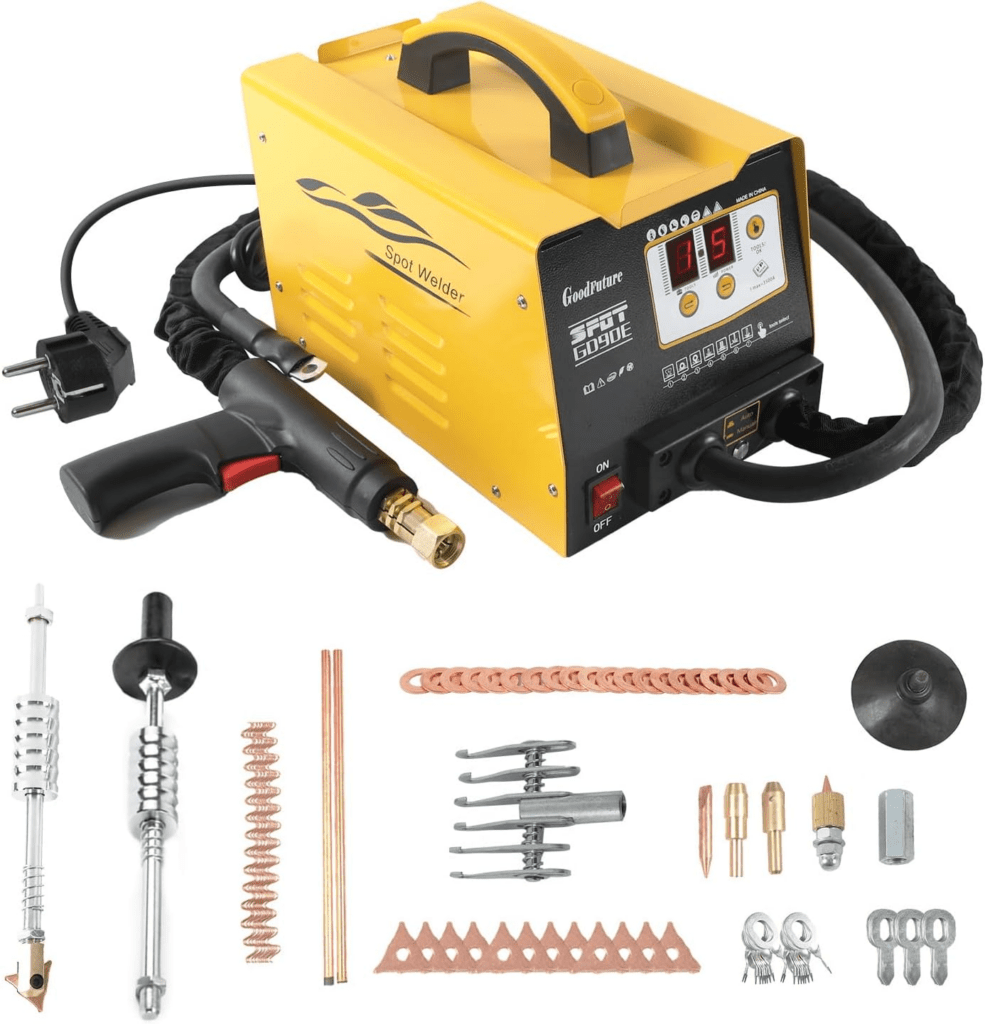
Three criteria drive the choice of a body repair stud welder. Capacitor power and charge capacity determines the maximum weldable thickness and stud holding strength — for standard automotive sheet metal (0.6–1.5 mm / 0.024–0.059 in), a mid-range unit covers the vast majority of jobs; for thicker panels (sills, floors, commercial bodywork) higher power is needed. Accessory compatibility (range of studs, pins, washers, hooks, pulling tools included or available) determines the tool’s versatility across different dent shapes and locations. Aluminium compatibility is increasingly important as modern vehicles use more aluminium panels — check that the unit has an aluminium mode or suitable power adjustment. VEVOR stud welders offer excellent value for everyday body repair work.
7. Safety when using a stud welder
The stud welder is generally safer than arc welding (no UV radiation, little fume on bare steel), but carries its own risks. Contact burns from hot parts and metal spatter during welding are the most common hazards — always wear gloves and eye protection. The electrocution risk is limited but real with a faulty capacitor or damaged cables — inspect equipment before each session. When grinding old paint (possibly lead-based) or treated surfaces, the dust from surface prep can be toxic — wear an FFP2 respirator and ensure adequate ventilation. Flying studs that break free during pulling are dangerous — always stand to the side when pulling. Per OSHA 29 CFR 1910.252 and AWS Z49.1, appropriate PPE is mandatory in professional settings.
Key Takeaways
- Capacitor discharge welding: the stud welder fires a millisecond pulse through a stud onto the panel surface — bonding it without penetrating the metal.
- No rear access needed: all work is performed from the outer panel face — ideal for pillars, sills and areas where the inner structure cannot be reached.
- Energy setting by thickness: match the weld energy to the sheet metal gauge — too high burns through, too low fails to bond the stud securely.
- Slide hammer technique: after welding the studs, the slide hammer pulls the panel outward progressively — work from the edges inward for the best result.
- Fast and cost-effective: pulling a dent with a stud welder takes 20–30 minutes vs hours of disassembly — saving time and labour costs.
8. Frequently asked questions about the stud welder (FAQ)
What is the difference between a stud welder and a spot welder?
A stud welder welds a temporary stud by capacitor discharge onto one face of the panel to pull out dents — no rear access needed. A spot welder joins two overlapping panels by resistance heating between two electrodes — both faces must be accessible, permanent weld nugget produced. The two tools complement each other in body repair: stud welder for dents, spot welder for panel replacement and structural spot reconstruction.
Must paint be removed before using a stud welder?
Yes, without exception. Paint, primer and underbody coating are electrical insulators that block the capacitor discharge from reaching the metal — the stud will not weld, or will weld very poorly. The weld zone must be ground to bare metal (P80–P120 grit disc), slightly larger than the dent area. The earth clamp must also be attached to bare metal nearby.
Can a stud welder be used on aluminium?
Yes, but with specific precautions. Aluminium requires dedicated aluminium studs and electrode (never mix with steel accessories — contamination risk). The surface must be degreased and brushed with a stainless steel wire brush reserved for aluminium to remove the oxide layer. Power must be reduced (high thermal conductivity) and pulling must be very gradual to avoid tearing the metal. Some entry-level stud welders are not aluminium-compatible — check the unit’s specifications.
How do I know if the stud is properly welded before pulling?
A properly welded stud resists light manual twisting — it does not come off by hand. Visually, the stud base should show a regular metal fillet all around it, with no excessive blackening (burn) or gap between the stud base and the panel. If the stud rotates easily by hand, the weld is insufficient — adjust power and re-weld nearby (avoid welding in exactly the same spot).
How many studs should be welded on a dent?
It depends on the size and complexity of the dent. For a small simple dent (diameter under 2 in / 5 cm), 3–5 studs are usually enough. For a medium dent (2–6 in / 5–15 cm), 8–15 studs in concentric rings from the edge to the centre. For large deformations, multiple weld-and-pull sequences are needed, sometimes with washers or bridge pullers to spread the force over a larger area.
Can a stud welder replace PDR (paintless dent repair)?
No — PDR and stud welding are complementary techniques. PDR works by pushing from inside without touching the paint — ideal for small regular dents (hail damage, door dings) where the paint is intact. The stud welder is needed when inner access is impossible, when the paint is already damaged, or when the deformation is too large for PDR. An experienced body technician uses both methods depending on the situation.
What power output does a body repair stud welder need?
For standard automotive sheet metal (0.6–1.5 mm / 0.024–0.059 in), a unit delivering 800–1,500 J covers the vast majority of jobs. For thicker panels (sills, floors, commercial bodywork) or aluminium requiring precise settings, a higher-power unit with digital adjustment is recommended. VEVOR stud welders offer excellent value for everyday body repair jobs.
Can a stud welder be used on galvanised steel?
Yes, but the zinc coating increases surface resistance and makes welding harder. Grind more aggressively to expose base metal, and slightly increase power compared to bare mild steel settings. Zinc fumes released during welding are toxic — work in a ventilated area or wear an FFP3 respirator.
Conclusion: stud welder — the essential dent pulling tool
The auto body stud welder is the go-to tool for any dent repair without rear panel access: fast, precise, no disassembly required, compatible with steel and aluminium. With the right power settings for your sheet thickness, careful surface preparation, a methodical edge-to-centre approach and slow, controlled pulling, you will achieve clean and lasting results on any type of body dent. Discover our selection of VEVOR stud welders, spot welders, MIG/MAG, TIG and MMA welders for your workshop.
{ “@context”: “https://schema.org”, “@type”: “FAQPage”, “mainEntity”: [ { “@type”: “Question”, “name”: “What is the difference between a stud welder and a spot welder?”, “acceptedAnswer”: { “@type”: “Answer”, “text”: “Stud welder: temporary stud welded by capacitor discharge on one face for dent pulling without rear access. Spot welder: permanent joint between two overlapping panels via resistance heating — both faces must be accessible.” } }, { “@type”: “Question”, “name”: “Must paint be removed before using a stud welder?”, “acceptedAnswer”: { “@type”: “Answer”, “text”: “Yes, without exception. Paint and primer are electrical insulators. The weld zone must be ground to bare metal (P80–P120) before welding.” } }, { “@type”: “Question”, “name”: “Can a stud welder be used on aluminium?”, “acceptedAnswer”: { “@type”: “Answer”, “text”: “Yes, with dedicated aluminium studs and electrode, degreasing and oxide removal. Reduce power, pull very gradually. Check unit aluminium compatibility.” } }, { “@type”: “Question”, “name”: “What power output does a body repair stud welder need?”, “acceptedAnswer”: { “@type”: “Answer”, “text”: “For standard automotive sheet metal 0.6–1.5 mm: 800–1,500 J covers most jobs. For thicker panels or aluminium: higher-power unit with digital adjustment recommended.” } } ] }Frequently Asked Questions about Stud Welders
What metals can I weld studs onto?
Stud welders work best on mild steel and stainless steel. Aluminium is possible with specialised capacitor-discharge equipment and the appropriate stud alloy. Galvanised or coated surfaces need to be lightly sanded at the weld point beforehand to avoid porosity and weak joints.
How do I choose the right stud size for my application?
Stud diameter should be at least three times the base metal thickness for a reliable joint. For automotive bodywork and general fabrication, common sizes range from M3 to M8. Longer studs (over 50 mm) may require drawn-arc welding rather than capacitor-discharge to achieve full penetration and strength.
Can a stud welder be used for dent pulling?
Yes — many stud welders include a dent pulling attachment. The device welds a small tab or stud to the dent, then uses a slide hammer or puller to extract the metal back to its original shape. This technique preserves the paint finish and is widely used in professional bodywork shops for paintless dent removal (PDR) on hail damage and door dings.